Beginners guide to Geocaching
What the Heck is Geocaching? A Beginner’s Guide
Thanks to
| It’s a high tech Easter egg hunt. Someone hides a container of inexpensive knickknacks — a cache. Then they post its latitude & longitude on the internet, and other people go hunting for it. If they find it they trade knickknacks and sign a log to record their visit. The picture on the right is an example of a classic cacheIn Mid. ’03 few people had heard of geocaching — it was almost a secret game. It’s grown a lot since then. I stumbled onto the game about a year later and have been playing since.
The minimum you have to have to play is a handheld GPSr (Global Positioning Satellite receiver). Global Positioning Satellites are used in all forms of navigation today. They send signals that these receivers use to figure out where on the surface of the earth they are. As the game has grown it’s developed a number of variations. There are micro caches that are only large enough to contain a rolled up, or maybe folded flat paper log for you to sign. There are puzzle caches, and other spin-offs. (Here’s a list of cache types.) There used to be locationless (also called reverse caches) and virtual caches, but as of the end of 2005 locationless caches are no longer supported by geocaching.com . Most (many?) preexisting virtual and webcam caches can still be hunted and logged as finds, but no new ones are being approved. There’s more than one website that supports this game, but far-and-away the most extensive and most popular is, what else,geocaching.com — also called Groundspeak. You get cache locations there and then return there to record your success or failure to find them. Near the upper middle of the main page you can enter your zipcode or address and get a list of the caches near you. Another geocaching site is Terracaching.com. They still support the wider variety of forms, but are quite small. When I explain geocaching to friends the inevitable question is, “Well if the GPS gadget takes you right where it is, what’s the game?” First, the gadget only gets you close — typically about 10-15 feet away. And, the cache is hidden — either from geocachers to increase the challenge/fun, or to conceal it from muggles. Muggles are the uninitiated — people who don’t know about geocaching, and may stumble on the cache and take it, ruin it, or throw it away. But, the real fun is discovering endless new parks and interesting places near you that you never knew were there. It’s absolutely astounding how many interesting places there are near you that you’re probably unaware of. If you resist the temptation to make this a contest and just have fun and enjoy the places it takes you, it will be a more rewarding activity. Kids love it, so it provides a setting for outdoor family fun. Note: In recent years geocaching has moved more and more toward microcaches. They are cheap and easy to hide and people who play the game to compete for number of finds can go from parking lot to parking lot quickly. This saddens me, I don’t find it fun to visit Walmart and Home Depot parking lots. Sigh . . . Click here to visit my photo journal of the places I’ve gone and caches I’ve found. One weakness is the FAQ’s at the geocaching website aren’t thorough. That’s why I decided to create this page. To help beginners learn geocaching. Here’s help with some of the fundamentals: Table of Contents Which GPS Receiver? They cost from $100-$600+. To start geocaching you should be able to get a satisfactory unit for $200 or less. Don’t confuse the automobile navigator GPSrs with the handheld ones used for geocaching. As of fall 2008 a few of the navigators are beginning to get the functionality for geocaching but, for now, you still need a handheld. The two most popular brands are Magellan and Garmin, and Lowrance is also in the game. Garmin sells many more GPSrs than Magellan. There’s a lot of ill-founded but intense brand loyalty. From what I’ve read comparable units perform about the same across brands. Today I think all models support something called WAAS. If you buy a used unit you want WAAS. In my opinion if you are buying a GPSr and you’re in the United States you want one that supports WAAS — it increases the accuracy by up to a factor of 5. I used to say, other than this about all you get for more money is more features — not better basic accuracy, but with mid-price units sold since about 2007 you can get better/faster accuracy. Newer mid-price units (with theSiRFstar III chip) have better sensitivity than older units. If you already have a handheld GPSr that lets you transfer waypoints (cache locations) to it from your computer it will do fine to start you out. As of Nov ’06 WAAS only worked in North America and (sort of) in Europe, so the rest of the world does without it anyway — I haven’t checked on this recently. The newer higher end units also let you carry cache data in them. This is information from the cache page giving cache description, hints and some of other peoples logs that talk about finding the cache. The most popular GPSr for beginning geocachers may be a Garmin eTrex Legend. I’ve never used one, but the more I learn about this unit the less I care for it. For three years I used a Magellan SporTrak Pro and was happy with it (This model has been discontinued. You’ll have a terrific deal on a beginning unit if you can get a used one with/cable for $60 or less on EBay. Be sure it has a cable.). A number of people believe the older Magellan units do a better job of finding locations in adverse conditions, like heavy tree cover, than the older eTrex and other low priced Garmins (Recent mid to upper priced Garmin models with high-sensitivity receivers probably do a little better than the SporTrak). The tradeoff is the older Magellan’s take longer to settle down when you reach the general area of the cache. You have to wait a minute or so for them to decide on the final location, whereas the Garmin units don’t have this delay. My Magellan did a good job in tree cover, but I did had to give it a minute or so to settle on an answer after I got near the cache. The bottom end of the Magellan and Garmen lines are inexpensive, but you may not be able to transfer waypoints to them from your computer. This rules them out for geocaching as far as I’m concerned. A few years ago I bought a Garmin 60CSx — it’s still considered the top handheld by geocachers as of January ’11. I haven’t found it a lot better than my SporTrak for basic cache finding, but it has some features that make it easier to use. USB is much better than Serial Port for sending/receiving data to the unit. Battery change-out is easier. The popup menus are nice. It holds more caches. Batteries last much longer. If you use it for maps (I don’t) the color screen is easier to read. And, if you’re an FTFer (First to Find) Garmin’s direct download from the geocaching website into your unit is nice. Click here for my review-comparison of the 60CSx vs the SporTrak. You’ll want a cable that hooks to your computer to download cache information into your unit. To repeat, some cheap models don’t connect to a computer — avoid them. Entering waypoints manually is very tedious; plus, the first time you wander off into some awful place because you entered one of all those numbers wrong you’ll regret not buying a unit that lets you enter them with your computer. The cable itself is an optional extra with some inexpensive models, and it’s cost can make-up the difference in the price of a better unit, so consider that if using cost as a deciding factor. You don’t need a high end GPSr for geocaching.[update note: models released after 2004 all seem to have USB connections] Here’s a page of geocacher reviews of GPRs. How Do I Get Cache Locations Into My GPSr
Go to the main geocaching.com web page. Enter your zipcode in the middle area. This will give you a list of caches moving out from the center of your zipcode. You could go to each cache page and enter the coordinates into your GPSr manually, but that’s a lot of work, and an error can put you in the some terrible place. (You’ll have to do it this way if you don’t have a computer cable.). At the bottom of the list is a button that says Check All. Click this and it will mark all caches on that page for download. Then click the Download Waypointsbutton and download the file that contains this list of coordinates. You have to register to see or download specific cache data, but it’s free. Geocachers use handles/pseudonyms like Renegade Knight, OpinioNate, moonpup, despot&smitten, guttergrrl, tirediron. When you register, your username becomes your geocaching name, the name you will be known by. Also, you will have to write it over and over and over in all the cache logs, so you may want a short easy to write one like Thot 🙂 Spend a little time thinking about what you want to be called before registering. Click here to see a list of geocacher’s names. Think about signing a name like “headed_west_and_never_looking_back_0671” hundreds of times, often on tiny pieces of paper. Recently (2010) they made it easier to change your name — you do it where you edit your profile. But, you want to do it quickly, else everybody who’s come to know you as BuxomBetty won’t recognize you as 34Thelma. Now go here and download & install the program EasyGPS. If you double-click on the cache list file you downloaded it will start EasyGPS. Hook the cable you got with your GPSr to your computer. Unfortunately some older models haven’t entered the 21st Century and still use Serial Ports, so you may have to ask a computerish friend to help you setup the cable connection the first time.. [I understand there are 9 pin serial-to-USB adapters for GPSrs available — e.g. $15 at Best Buy.] Once you tell EasyGPS which brand & model of GPSr you have (and if its an older unit, which Comm port you’re using), and turn on your unit; then click this button on the EasyGPS toolbar and it will load the set of cache coordinates/waypoints into your GPSr. You have to download these lists one page (20 caches) at a time. It’s a little clumsy to work with these sets one at a time. For that reason I wrote a program which combines many sets into one. You can download it here. It’s free. I think the latest version of EasyGPS let’s you load multiple cache files so you may not need my old utility. If you decide to become a Premium Member ($30/year or $3/month) there’s a more convenient way to get cache lists. They’re called “pocket queries.” I have no idea what they have to do with pockets. If you really get into this you’ll probably want to get a program named GSAK. It costs a few bucks and is more difficult to learn, but it does a lot more things with pocket queries than EasyGPS. The more you use it the more you will realize what a remarkably versatile program it is. What Should I Carry When I Go Geocaching? As you might expect, opinions vary on this question. My list is from the perspective of an old guy. I use a denim carry bag to keep things together/collected, to carry to the car when I start out. Here’s the contents of my bag. When I leave the car for the hunt I take the bag, but I leave some items from it in the car. My stick is always in the trunk, except when I’m on a hunt. Here’s my list:
The stick and the following items are more important to us old codgers who can’t climb, stoop, bend, squat and kneel like younger folks. And, irregular ground is more of a problem – it threatens a fall and things break easier.
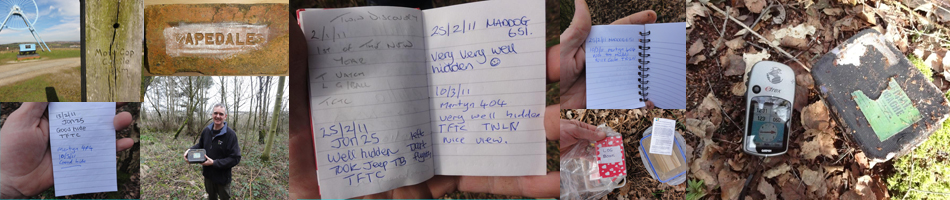
I leave a couple of bottles of water in the car. If I expect to be out in the heat for over an hour I carry a bottle in my hip pocket. I carry very little swag (stuff to trade) because I don’t trade. I go for the places I see and the fun of the hunt. I’ve only taken things from the cache when they were required to complete the cache instructions, or an occasional First to Find prize. The only rule is you must sign the log. Normally those who trade list what they took and what they left in their web log. (UPDATE: As the game has evolved fewer people list trade items in their web logs.) If you don’t plan to trade you may still want to keep one nice trade item in your bag in case you discover something you really want. I carry two good condition Sacagawea dollars for such situations. I’ve had a Leatherman type tool and a first aid kit in the trunk of the car for years. I carry a small Spyderco pocket knife and a tiny cell phone (fits in my watch pocket) at all times, so I didn’t put these on the list. I think a cell phone is essential if you cache in the woods or remote areas — particularly if you cache alone. Tips For Green Cache Hunters? A cardinal rule is, if you trade items, trade even or trade up. That is, leave an item of equal or greater desirability than the one you took. Please don’t trade a broken McDonalds toy for a pocket watch. Near the top of the cache description page you’ll find the “Size.” Try to stay with regular caches in the beginning if you can. Micros are often hard for everyone, especially beginners. Probably the most common micro is a 35mm film container, but they can be a little larger. The official micro container is about twice as big around and half as long as your little finger. Micros can be as small as a marble. It’s becoming more common to use these evil nano caches. (TIP: These tiny caches have rolled up pieces of paper for logs, when you put the log back, put it in the lid — don’t try to put it in the body and then replace the lid — you’ll just make a mess and become frustrated.) Even when micros say one star they’re likely to be difficult and can be discouraging to a beginner. Micros are often attached by magnets to metal objects. Common “small” containers are Lock-And-Lock and serving size Rubbermaid. “Small” caches I’ve found are typically about the size of a tennis ball or a stack of 7 Hershey bars, but small caches can be almost any size from somewhat larger than a 35mm film container to a quart/liter. As you probably guessed, smalls are easier to find than micros, but harder than regular caches — surprise!
Try to stay with the easier to find regular size caches to start. On the cache page it will rate the difficulty of caches from 1 to 5 stars. The first number is how hard it is to find. The second, how hard it is to get to it — the terrain. A 1/5 will be easy to find when you get to it, but may require a boat and scuba gear to reach it. Try hunting caches in this order until you get some experience: 1/1, 1/2, 1/3 (1/4 if you’re athletic), then 2/1, 2/2, etc. [NOTE: Ordinary people (all sorts) assign those numbers, so there are 1’s I’ve never been able to find and 3’s I found immediately. Typically, the terrain ratings are more accurate than the find difficulty ratings.] Decrypt the hints when you print the cache description page and include as many logs as you can for at least the first 5-10 caches you try. Finding them gets easier with experience, but it can be challenging at first. Study all the logs left by others for clues to the cache location. They may also alert you to problems like — “Watch out for the hornets nest in that tree north of the cache.” Make handwritten notes of anything special like this on the pages you print out . If the latest logs have been DNFs (Did Not Finds) wait on that one until someone else finds it — it may be missing. Tip: If you print cache pages days in advance be sure to check the website just before you leave in case the cache has gone missing. It can be very discouraging to spend a hour searching for a cache that’s no longer there. Quickly scan all the logs for purple faces — DNFs. These often signal difficult caches. One, or two out of 30 may or may not, but 5 out of 20 means it’s almost sure to be difficult no matter how the owner rated it, unless it was missing for a while. Be sure your GPSr’s Map Datum is set to WGS84 Believe your GPSr, but don’t be slaved to it. When you get within 20-30 feet (6-10 meters) start looking around for where it might be hidden. Many beginners either depend too much on the GPSr, or don’t trust it enough. Either is a mistake. The satellites that the devices use are constantly moving, so some days, times and places you get better answers, and sometimes you get very bad results. Also, in heavy tree cover you can get bad results. In 2004 I did a survey of experienced geocachers and the coordinates got them to within about 20 feet (6 meters) of the cache on average. Since then GPSrs have gotten more accurate so this distance should be less. Just remember, it’s a combination of your unit’s error and the error of the person who provided the coordinates. Some (particularly new) cachers aren’t careful in determining the coordinates for their caches. Older GPSrs without WAAS may have an error of 30+ feet. If you or the cache owner has one of these models, well . . . My personal experience is the cache is typically nearer than 15 feet (5 meters) when I reach ground zero, but I’ve run into a few caches where the coordinates were off as much as 60 feet (20 meters), and a couple or three rare cases where they were off about 175 feet (55 meters). I would have never found these except for thinking about where they must be hidden. If you cache in the same area, over time you will learn which cache owners usually post good coordinates and which will frustrate you. There’s a senior cacher in my area that I sigh when I see it’s their hide because the coordinates are probably going to be off 30 or more feet. Try different displays/screens on your GPSr until you find the one(s) that works best for you. Most GPSrs have one or more screens thatpoint toward the cache. You must be moving/walking in a straight line for it to point to the cache. It knows where the cache is, but doesn’t know which way you are facing and thus which way to point if you’re not moving. Most units have a screen that looks like a compass, but instead of pointing north it points at the cache. Personally, I don’t like them. If you stop walking they lose their mind. And, I find them confusing — they start behaving erratically as you get near the cache, the place where you need them most. But, many very experienced geocachers rely on these pseudocompasses almost exclusively. Now that I’ve used both Magellan and lower priced Garmin units I think I know why. I think the Map method I use works better on Magellan units than on low end Garmin units like the popular eTrex Legend. I suggest you go to a nearby park and “waypoint” an object you can remember such as a stump, water fountain, etc. Then walk a hundred or so feet away and use the device to return to the location. Do this a few times then choose another object and do it again. Try using different screens. Save these coordinates and try to find the locations again another day. Repeat this until you get a feel for how the gadget responds and which displays work best for you.
If you’re interested in how I setup my GPSr, and my technique for homing in on cache coordinates, I describe it Here. Sometimes a cache will be in an area where you can’t walk/move fast enough or in a straight line. (For the map screen pointer or the pseudocompass to work you must be moving about 1 mph/1.5 kph in a straight line.) In this case you may want to try compass-triangulation as illustrated Here. If you’re going into uncertain territory capture a waypoint at your car (“waypoint your car”) as you leave it. Create another waypoint at a trailhead, and any point where you go off-trail in a wooded area, so you can find your way back out. You will get so preoccupied wandering around looking for the cache you may get completely disorientated/lost — there are lots of stories of cachers who spent unpleasant nights in some godforsaken place because they got lost. You should also learn how to use your unit’s backtrack feature, and be sure it’s turned on. Backtrack is a feature on most units that, if active, shows you the path you took to get were you are. You can follow it to go back the way you came. Practice switching to and using this mode, so if you get lost you can use it to retrace your steps. The commands to operate these gadgets are arcane and you aren’t likely to remember how to do it when you need it if you haven’t practiced. You may not need to use the backtrack feature for a long time, so be sure to refresh your memory on how it works every week or so at first and month or so after that. Be sure to take your GPSr manual in the car (and maybe on the hunt) until you’ve learned and had experience using its features. As long as we’re on the topic of safety, tell someone where you will be and for how long. Add some to the time so people won’t start worrying too soon. I mention again the importance of a stick. To some extent this is a game better suited to younger more agile people. I’ve had to give up on a few caches that would have required a mild form of acrobatics to reach it and get back. When you can’t find a cache you’re tempted to try more and more unusual things/locations. Don’t take risks. Almost certainly the cache isn’t in that risky location anyway. There are many other caches, and you won’t get demoted, lose money or be ridden out of town on a rail if you pass on this one, and on the next, and the next. If the terrain is a 1, 2 or 3 you can usually assume it can be found without doing anything unusual. In my limited experience they’re rarely more than 60-80 feet off a trail and usually not that far. If it’s farther, or it looks like you’ll need a machete to get through the undergrowth look for another way to it. One of the biggest mistakes beginners make is to want to go straight toward where their gadget points. ALWAYS look around for easy paths before taking difficult ones. The trail may curve ahead, so you may fight a new path through a terrible jungle just to come out back on the same trail. Stories abound of the guy or gal who waded the creek or got cut up climbing through the fence, or bushwhacked their way through 500 feet of undergrowth just to find when they got there the cache was 20 feet off a main trail. Walk past the cache to see if there’s not a better way to it. The person who placed the cache didn’t want to bushwhack their way in anymore than you do. On a larger scale, when I first arrive near the general area I may drive around for 5-10 minutes looking for closest place to park for the easiest, or shortest way to begin. When searching for the cache look for something unnatural or out of place — piles of sticks, bark, rocks, leaves or other debris. Here’s an example. Also check out tree stumps, logs, and hollow tree trunks. Small caches are sometimes off the ground and Micros almost always are. The crotch or V in trees where major members fork is a popular place for micros — or maybe a knothole. Micro caches are sometimes attached to the underside of things. They’re often attached to metal objects with magnets. Then there are light pole caches that have come to cover the earth in our area. I’m not sure there’s a parking lot without one. If you look at the bottom of parking lot light poles, they normally have a rectangular box-like cover/skirt at the base. This cover will lift. Today, many micros are attached to the inside of the skirt of this cover with magnets — often using magnetic key holders you get at the dollar store. If you find yourself driving around on a paved parking lot looking for a micro, it’s almost surely a light pole cache — also known as a “skirt lifter.” One of the secrets to successful geocaching is to become a tracker. People who’ve been to the cache often leave evidence of the path they took and where they found the cache — footprints, broken limbs, crushed weeds, deformed shrubs, etc. Well worn ones are called geotrails. This opening was a dead giveaway to what would have otherwise been a bear of a route in. Look for the route that has the least brush, thorns, vines and other fun stuff to plow through because a cacher before you has already thinned it out with his body. I forgot and left my GPSr in the car one day on a FTF (First to Find) hunt, but it was in an area of high weeds. I simply followed the trail the owner made when he placed the cache — took me straight to it. Don’t beat your head against a wall trying to find a cache. Pass it by and come back to it later after you’ve gained more experience. My second cache was a very hard micro I couldn’t find. When I finally went back I found it based largely on tricks I’d learned in the meantime. Also, it may be missing. In the upper right of the cache page you can click this icon to watch a cache listing to see if someone else finds it. You’ll be sent an email if somebody logs it. I usually don’t go back to a cache I failed to find until somebody finds it or the owner assures me it’s still there. Some trading don’ts: Don’t leave food or items that smell (like scented candles or soap). Animals have keen smellers. They’re known to destroy caches looking for food. Finally, nothing dangerous or inappropriate for children. In selecting swag (trade items) keep in mind many caches aren’t watertight. If you still want to leave things that’ll ruin if they get damp, it’s a good idea to seal them in ziplock freezer (heavy weight) bags. Put the cache back the way you found it, and where you found it, unless you have very good reason to believe it wasn’t in it’s intended hiding place. In this case, send an email to the owner explaining what you did. Don’t help the owner by moving the cache or hiding it in abetter place — they may want it to be very easy (or hard) to find. Don’t move the cache to where your GPSr says the coordinates are. Did I mention waypointing your car and taking water if it’s a long hike? And, don’t forget to log your hunt on the geocaching.com website after you find (or don’t find) the cache. Go back to the cache page. In the upper right click this icon to log your find. . On the page that comes up select Found It, Didn’t find it, or Post a note. Change the date to whatever day you found the cache, then type in some comments about your experience. In the beginning, read some other people’s logs for examples of what to say, and submit your log. Here’s a discussion on why you should record your DNFs — caches you Did NotFind. Travel Bugs Travel bugs (and coins) are a side aspect of the game. You can do them or not. Travel bugsare (usually) smallish objects with an identifying “dog tag” attached, that are moved from cache to cache. The dog tags are used to track/log their movements. To be technically correct the dog tag is the travel bug, and the attached object is the hitchhiker. But most people, refer to the combination of the two things as a travel bug. This is my Blow & Gotravel bug (NOTE: It appears to have died in the hands of a cacher named Water Bear in May ’08). Travel bugs usually have a goal/mission/objective. Blow & Go’s mission is to travel to every state in the U.S. following some simple rules. Travel bugs are not trade items — you aren’t expected to leave something in exchange when you take a travel bug, and conversely, you shouldn’t take a trade item if you leave a bug. [Note: Some “travel bug hotels” require you leave a bug if you take a bug. Personally, I boycott this kind of arrangement because bugs can get trapped in them.] If you pick up a bug you’re expected to move it to another cache somewhere that (hopefully) will help it towards it’s goal — at least not detract from the goal. For example, if it’s goal is to go from California to New York don’t move it from Texas to Arizona. On the other hand moving it around in a local area is okay even if it moves a few miles the wrong way. Don’t hold a travel bug for a long time. If you can’t put in in another cache within couple of weeks, don’t take it. Logging travel bugs can be quite confusing the first few times. They have their own independent tracking system and thus are logged in addition to and different than caches. Click here for my explanation of how to pick up and drop off travel bugs. There are also geocoins. Coins work much like travel bugs but there’s no hitchhiker, the coin is the entire thing that travels. Also, people collect geocoins. FTF — First To Find Some people compete to be the first-to-find (FTF) a new cache. This can be a little difficult to do in urban areas with many cachers rushing to get this honor (and sometimes a special FTF prize). |
Thanks to http://www.factsfacts.com/geocacher.htm
How to Geocache – A step-by-step guide for beginners
What exactly is a cache?
What you’re looking for – the cache – is usually a small box, anywhere from the size of an Altoids container to a small shoebox. They are hidden out of view so a casual passerby will not see or notice them. They usually have a magnet inside to affix it to the bottom/back of a sign, rail, or fence, or they are wrapped with dark or camouflage tape to keep it dry in the case of rain and also keep it hidden. Inside you’ll typically find:
- a pad of paper with a log of previous visits
- a small pen or pencil, but not always there so bring your own
- a collection of trinkets or geocoins left by previous visitors
Geocaching – A modern-day scavenger hunt
Geocaching (GEE-oh-cash-ing) is a great outdoors recreational activity that’s similar to a scavenger hunt. There is a hidden object, and you’re given clues and GPS (global positioning) coordinates to help you find it. It’s incredibly fun, and becoming more and more popular every day.
I began geocaching about 2 years ago and have since found well over a dozen geocaches all over California (including San Francisco, Oakland, Napa/Sonoma, and Southern California). It’s a great way to explore an area, even places you’re convinced you know very well. People leaving geocaches almost always leave them in intriguing places that they’d like to share with inquisitive, curious people like other geocachers.
Best of all, it’s very easy to do for a beginning novice. You only need a few things to get you started.

What you’ll need
- a GPS receiver. These can be bought for about $100 these days (probably even less used), and some cellphones (like the Helio Ocean or Blackberry 8830) have them built in already. Garmin is the most popular brand of GPS receivers. Low-end ones are monochrome with limited functionality; high-end ones are in full-color with added features such as 3-D maps and the ability to store your entire trip.
- a pen or pencil. So you can leave a note in the cache to the cache owner.
- a small trinket. There’s a tradition among some geocaches to take a trinket out, and put a new one in. That way, the geocache has some “life” and changes continually over time. You also get something from a stranger, and give something to another stranger.
That’s it! Yes, for a beginning geocacher, that’s really all you need. And the 2nd & 3rd items above are often optional (many geocaches have their own pen, and others are too small for trinkets)
Used GPS receivers
 |
Barely Used NICE TomTom XL 335S Portable GPS Navigator
Current Bid: $79.99
|
 |
GARMIN NUVI 350 PORTABLE GPS AUTO RECEIVER USED TESTED
Current Bid: $36.79
|
 |
VR3 Portable GPS Navigation System 4.3″ USED!!
Current Bid: $43.95
|
 |
MIO MOOV M300 PORTABLE GPS SYSTEM IN BOX- SLIGHTLY USED
Current Bid: $39.95
|
![]()
New GPS receivers
 |
NEW Garmin Nuvi 255W Portable GPS System Bundle – Inclu
Current Bid: $132.99
|
 |
NEW TOMTOMXL335T 4.3″ PORTABLE GPS $228
Current Bid: $45.86
|
 |
New DeLorme Earthmate PN-60 Portable GPS Navigator NIB
Current Bid: $349.99
|
 |
*NEW* GARMIN NUVI 255 PORTABLE GPS NAVIGATION AUTO NIB
Current Bid: $92.99
|
![]()

Step 1 – Find nearby caches
This part is easy. Go toGeocaching.com and in the upper-right corner, put in your ZIP code (if you’re in the US), or select your country.
You will see a list of available geocaches nearby with:
- how close it is to you (by ZIP code)
- the type of cache – traditional, multiple (one cache gives you a clue to another), virtual or mystery caches (no actual cache – just a destination with something interesting about it)
- a rating of the difficulty and terrain (go for 1/1 for the easiest!)
- the date placed
- a short description plus a link for more information
- when it was last found by someone. This is always cool because some were just found and logged a few hours or days ago; others have been dormant for months.
Pick a cache and click on the link to get some more information you’ll need.

Step 2 – Select a cache
Find a cache that’s as close as you’d like (or willing to walk, bike or drive to), with the level of difficulty you’re looking for, and click on the link for more information. You’ll find several things on this page (register for Geocaching for free first – trust me, they don’t spam you and don’t make you pay for these basic services).
- the cache’s coordinates (you’ll need this string of numbers to enter into your GPS receiver)
- a description of the area and cache made by the person who left it there; some people are proud of the area and give plenty of rich information, others leave just the basics
- (usually) an encrypted clue, that you can easily decipher near the cache location if you’re really stuck and can’t find it
- even a map if you’d like a street corner to hone in on; I usually try to ignore this, because part of the fun is following the GPS receiver’s directions and seeing yourself approach the target
- a log of previous geocachers’ notes after finding the cache. It is usually full of spoilers, so don’t look at this section until you’ve found the cache and want to report something to the community.
You can either print out the entire page, or scribble down what you need to know on a piece of paper and take that with you.

3. Enter the coordinates into your GPS receiver
Follow the instructions of your GPS receiver to enter a new waypoint (a specific location with coordinates) with the cache’s coordinates. Believe it or not, those coordinates are specific enough to typically get you within 10 feet of the cache! Double check the numbers to be 100% sure they’re right–you don’t want to be searching for a cache miles away from where you should!
Note that the default coordinate type, both for the Geocaching site and most GPS receivers, is WGS84 Datum degrees & minutes (MinDec). The format will look like:
N 37° 45.800
W 122° 10.500

4. Start moving towards the destination
In your GPS receiver, choose this new waypoint you’ve entered, and GOTO. Then, go outside, away from tall buildings, and wait for your receiver to get strong signals from the GPS satellites circling the earth. This can take anywhere from a minute to five minutes. You will typically not be able to get a signal inside buildings or between skyscrapers.
Once you’ve gotten strong signals and hit GOTO, the GPS receiver will tell you which direction to start heading and how far away your target is. Start walking! (or driving, depending on how far you are) The GPS receiver is remarkably good at telling you where you’re supposed to go, and even how fast you’re going.

5. Use clues & your eyes to find the cache
When you get within 10-20 feet of the cache, the GPS’s resolution will not be good enough to help you any further. It just puts you in a 20 foot circle of where you need to look. Now you need to use the clues and your intuition to find the cache.
Look for clues:
- in the name of the cache
- in the description that’s on the page
- (if you’re really, really stuck) decypher the encrypted clue, but keep in mind this often explicitly tells you where to look, eliminating the fun out of the search
Places to look:
- the underside or back of metal fixtures and signs; often, the cache is magnetically stuck out of view from casual passersby
- in the brush or plant cover, often behind or under a retaining wall
- sometimes covered with rocks or bark
Keep in mind that the cache might be above you or below you. We found on cache in Union Square in San Francisco and after looking around the Christmas tree there for a good 20 minutes, we realized it could be under us, and took the elevator down to the parking garage below us!

6. Open up the cache!
Open up the cache carefully, and take a look inside!
There should be a list or pad of paper, which has some general instructions to people unfamiliar with geocaching, or for people who might have found it by accident. There will be a list of people who found them before you. You can leave a short entry in the (paper) log, along the lines of:
8/27/07 {username} TFTC! (Thanks for the Cache)
There might some other small trinkets. If you’ve brought one of your own, you can leave it inside, and take another one as a memento of your cache.
You should go back to the Geocaching site later, and leave feedback to the cache owner in the (Web) cache log, who typically checks it often.

Geocoins – Track your own coin’s movement
Geocoins are custom-made coins that you can leave in caches that you find. The idea is that your coin will travel from cache to cache over time, as people who find the cache take it out and put it in their next cache. Then they log where the coin has been left, allowing you to track where your coin has gone.
Say you left your own geocoin, with its own serial number, in a cache in Tempe, Arizona. Then, someone finds that same cache a week later, and takes it out. He then puts it in the next cache he finds in El Paso, Texas. If he plays by the “geocoin rules”, then he’ll go to the geocoin Website, look up the coin by its serial number, and register that it is now in a cache in El Paso. You, then, could do a search on your serial number, and see that the coin you left in Tempe has now transported itself across a couple of state lines to the east, in Texas!
Thanks to http://hubpages.com/hub/Geocache
So we see it all the time, what is Geocaching and what’s the best way to start Geocaching or how do you Geocache? Well we thought we’d do our best to answer the questions and give some good tips on how to begin Geocaching. Basically it’s a high tech treasure hunt, containers called caches with inexpensive bits and bobs are hidden all around the world. The cache location is posted on the main website geocaching.com, the latitude & longitude which you then use to find the cache. When you find a cache you sign the log book to record your visit and if there are knickknacks you can exchange.
The minimum you need to play is a handheld GPSr (Global Positioning Satellite receiver). GPS devices are used in all forms of navigation today most commonly in cars and boats. Global positioning satellites send signals that these receivers use to figure out where on the surface of the earth they are.
As Geocaching has grown it’s developed a number of variations the common being:
- Traditional
- Multi
- Mystery or Puzzle
Geocaching is a great family activity, using a GPSr only helps to find a cache so much, a good cache will be well hidden from geocachers and what the community call ‘muggles’, people who don’t know about geocaching thus providing a great “hunt” to find and re-hide the cache. Not only that Geocaching will take you to all sorts of beautiful and interesting places that you might not have otherwise been to or even known existed.
Once you’ve experienced a geocache you may go on to hide your own, or find more and come across the treasures of geocaching. Travel bugs and geocoins crop up in caches from time to time, these are significant items that are tracked by unique code on the geocaching.com site mostly. You can buy your own Travel bug or geocoin and release it into the geocaching world and track its progress as a whole new angle on the geocaching adventure.
Above all Geocaching should be fun, don’t put yourself or others at risk and respect the land and others around a cache location or place of natural beauty.
Thanks to http://www.thegeocachingshop.com/blog/index.php/beginners-guide-to-geocaching/
Geocaches can be of any size and can be hidden in locations from urban streets to vast wilderness areas. The beginner geocaching enthusiast may have trouble finding his or her first caches. This guide to finding a geocache will assist them in their goal.
Geocaches can be of any size and can be hidden in locations from urban streets to vast wilderness areas. The beginner geocaching enthusiast may have trouble finding his or her first caches. This guide to finding a geocache will assist them in their goal.
Geocaching is a hi-tech global treasure hunting hobby that all the family can enjoy. So what are you waiting for? Get caching!

Most weekends you’ll find my kids and I out in the countryside rooting around under trees and piles of stones looking for little plastic tubs full of treasure.
No we’re not some sort of cut-price amateur pirates. We’re out geocaching.
What is geocaching?
For the uninitiated, geocaching is perhaps best described as a hi-tech treasure hunt where you use a smartphone or GPS device to find caches — which you could perhaps think of as stashes — hidden all over the country. You just log onto geocaching.com either at home or using a phone app, find out if there’s anything hidden nearby, and then go out and see if you can find it.
The caches can be all sorts of shapes and sizes — anything that can hold a scrap of paper to sign counts. But most of them tend to be tupperware boxes full of toys and trinkets to rummage through and make swaps.
Fun for all the family
There’s no better way of encouraging a seven year old to go on a long country walk than the prospect of being able to periodically dive off the footpath and hunt for treasure. And the look of triumph in my kids’ eyes when they beat me to finding a cache is absolutely priceless, although I still maintain it’s because they are closer to the ground than I am.
It’s sneakily educational too. Not only are you teaching the kids about map reading and distances, but many of the caches come with interesting information on the history and geography of an area. There are even earth caches where you have to answer questions about the nearby geology before being allowed to log it as a find.
Some caches are wonderfully elaborate and well thought out. Our favourite series had a Harry Potter theme where we had to answer trivia questions on all the books in order to unravel the co-ordinates of the final cache. We’ve also done Snow White and the Seven Dwarves themed caches, and ones based on characters from The Lord of the Rings — which definitely appealed to my inner geek.
Find out more
You’ll find everything you need to know about the hobby on the geocaching.com website, including all the different types of caches, where and how to find them, and where to download the smartphone apps.
Thanks to http://www.readyforten.com/users/RFTDan/posts/21317-a-beginn


Leave a comment